
When I moved into my house – it was a blank slate. It was a 1970’s house that had been pretty much untouched since it was built, so when I saw blank slate..I mean wood paneling, white walls, and standard lighting, I was a excited. There wasn’t anything crazy going on, which made my work easier, but blank slates can also be very daunting!
Even as a designer, I was perplexed with my family room. It’s so uninspired and just BLAH. I painted the wood paneling a beautiful boho white, and after that, I was stuck. It took about 2 months until it hit me, I needed a vision. I don’t mean I was going to space out and it was going to come to me in a vision what to do in this room…I mean I needed to visually see it instead of thinking about it! So I did what I do for all my clients; I created a style board!
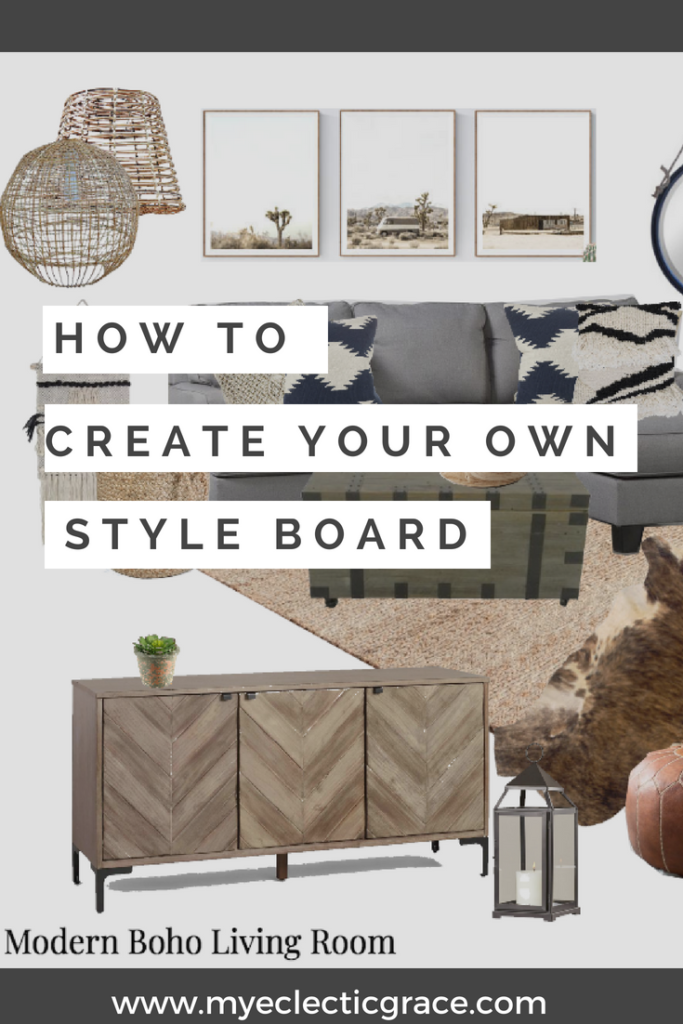
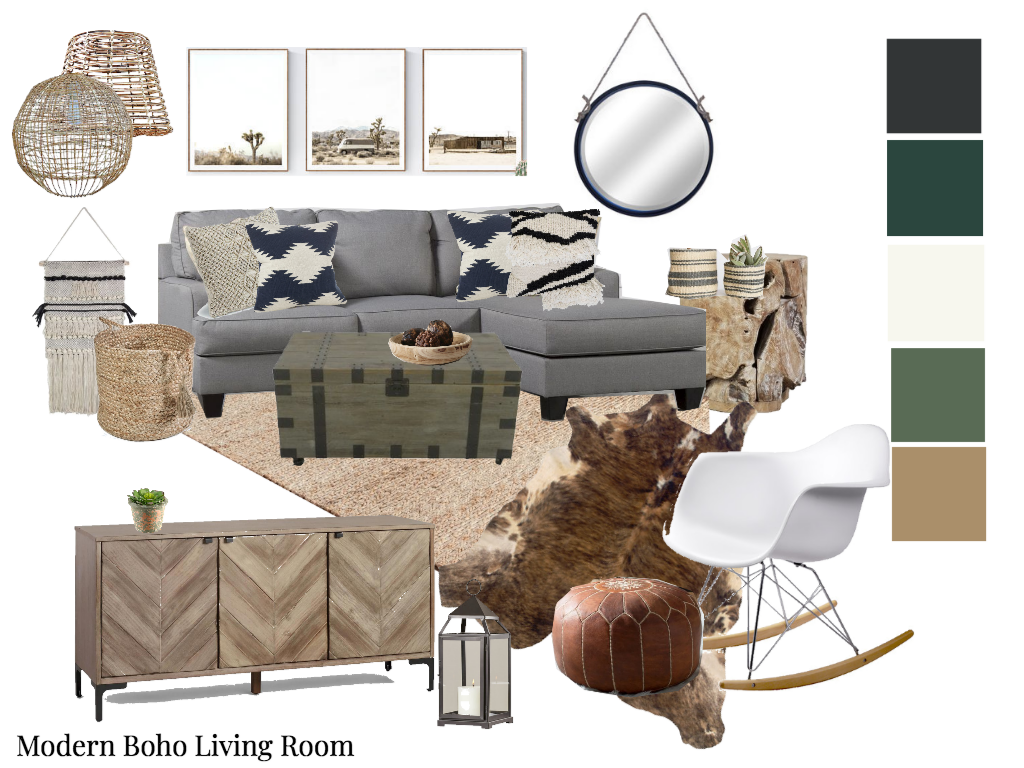
This is my style board below.
It has all the elements I want to see in my space, the color palette I want to carry throughout, and has some of my existing furniture pieces I’m working with. Now i’m going to break it down for you, so you can learn how to make your own for your space!
First I will say, style boards are like dream boards. They are meant to inspire and reference – so when you’re mindlessly walking through Home Goods and you have the itch to buy something for your house – think back to your style board (or be a wierdo like me who prints it out and brings it with her to the store) and see if the piece aligns with your overall look. This will keep your from just buying pointless things. BUT, just because I chose a specific pillow for my style board, doesn’t mean that that IS the pillow I will buy; it’s just the look and colors I like, and I want to find something similar. Make sense?
Okay – now follow along y’all.
Step 1: Existing Pieces
This is the first thing you need to do when creating a style board – identify what is staying in the space. Now you’ll notice, I didn’t include flooring or walls in this – those are structural and i’m not changing the flooring or wall color at the moment. If you want to include it in yours, that is totally fine, I just like to keep mine simple, so I didn’t include it. I am keeping my sectional sofa and trunk coffee table, so those are the first things I added to the style board.
Whether you are keeping a lot or just one thing, this is always the first step. Gotta work with what you got! And if you are starting from scratch, you can just skip this step.
Step 2: Color Palette
Now that you know what you’re working with, you can establish a color scheme. It can be simple, like black, white and one accent color, or you can do something more complex like I did in mine. I wouldn’t go above 6 colors however, because you’re going to overwhelm yourself at first. Pull colors from your existing colors OR a color you KNOW you are using. For instance, I have white walls, and I know I am going to use this color in my space, so I added white first. I also love green and wanted to use green in my space, so I pulled that in. Seeing the green next to my existing sofa helped me figure out the hue and amount of color to use in the space. Play around with this step until you figure out what you like – and if all else fails – visit Pinterest and search for color palettes in your style. IE: “Farmhouse living room colors”. Feel free to check out some of my favorite spaces for inspiration too!
Step 3: Foundation Pieces
Foundation pieces are an important step. A foundation piece is a large piece of furniture that the room centers around. For instance in my living room, the TV console was the next big item I needed. If I wouldn’t have already had the sofa and coffee table, then identifying that would be included here. Foundation pieces ALSO include area rugs – especially large ones that cover a majority of the floor space. Small accent rugs are not in this step! So for my style board, I identified a jute rug, TV console, and side chair.
Pro tip: Foundation pieces should be in-scale to the room and be cohesive with existing elements. Foundation pieces also are exactly what they sound like – they are the building blocks of the room, so this is where you need to make sure your needs are met [storage, size, quality, comfort, budget, etc].
Step 4: Accent Furniture
This step can be the hardest for most people! Accent furniture is all the little pieces that make the space what it is. Foundation pieces will be pretty neutral and transitional for most people – but accent furniture is where the style really shines! The accent pieces in my style board are the driftwood side tables, leather ottoman pouf, faux-hide accent rug, and rattan lighting pendants. So lighting, small furniture, and accent rugs are included in this step. Think about this step as the frosting on the cake – it’s the most obvious thing, but it’s not the entire dessert.
Step 5: Accessories & Art
Step 5 is also another area people get tripped up on. I get it, artwork can be totally daunting. Have you ever tried to design and hang entire gallery wall by yourself? *I have* But let me tell you – once you have steps 1-4 complete, you are going to breeze through this! I like to reference my color palette – and once I have my furniture in mind, I know generally where my art can go. For my living room, I liked the muted neutrals and boho vibe, so I chose modern desert photography and wall macrame for my wall decor. I also chose a mirror to go above the fireplace. This is where you can throw flowers, vases, lamps & small lighting features onto your board. Remember – you don’t need to include every small detail. Just doing as much as I did is a start that will keep you going on a clear design path!
Step 6: Complete & Implement
Love it! Print it! Share it! yYou can even keep it with you on your phone. You can use this as a reference when you shop, or to plan out your dream space! It’s okay to go back and change things, it’s your style board after all!
These steps are all building blocks – when you first look at a board, it can be over whelming to know where to begin. However, hen you break it down, you can dive deeper into what you truly want, and build your room from the ground up (no pun intended!)
where & how to make a style board:
If you want to make one just like mine for free – you can use Google Sheets, Powerpoint, or Adobe Photoshop! Simply just drag pictures you find online or pictures of your existing space onto the digital sheet. There is no right or wrong way to style it! Keeping it clean and simple is easiest, and if you feel you can’t fit it all on one “board”, then create separate sheets for furniture, color and accessories.
If you create a style board, show me! Tag me on Instagram or Facebook, I’d love to see what you created!
And remember, if you love this blog post, share it or Pin it ♥

2 Comments
These are all great tips! As an interior designer, I use many of these guidelines as well when I put together my ideas. Having all selections on a page together helps visualize the space and keep everything cohesive.
Thanks Chelsie! I’m so glad you enjoyed it. I love creating them – it’s so fun!