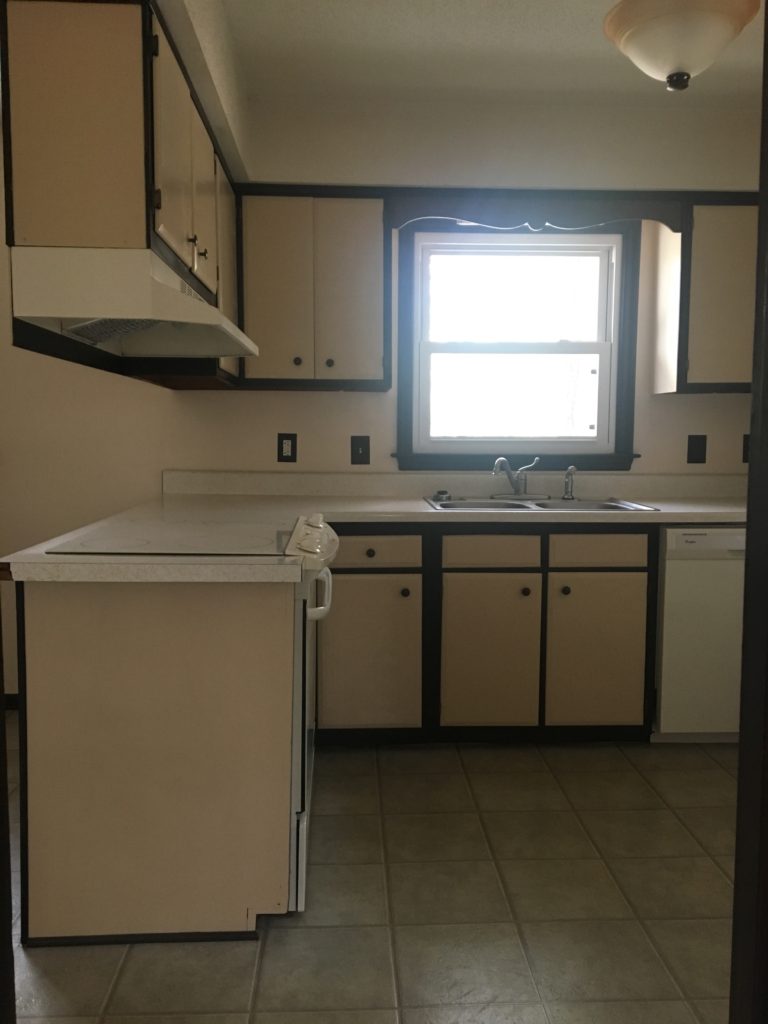
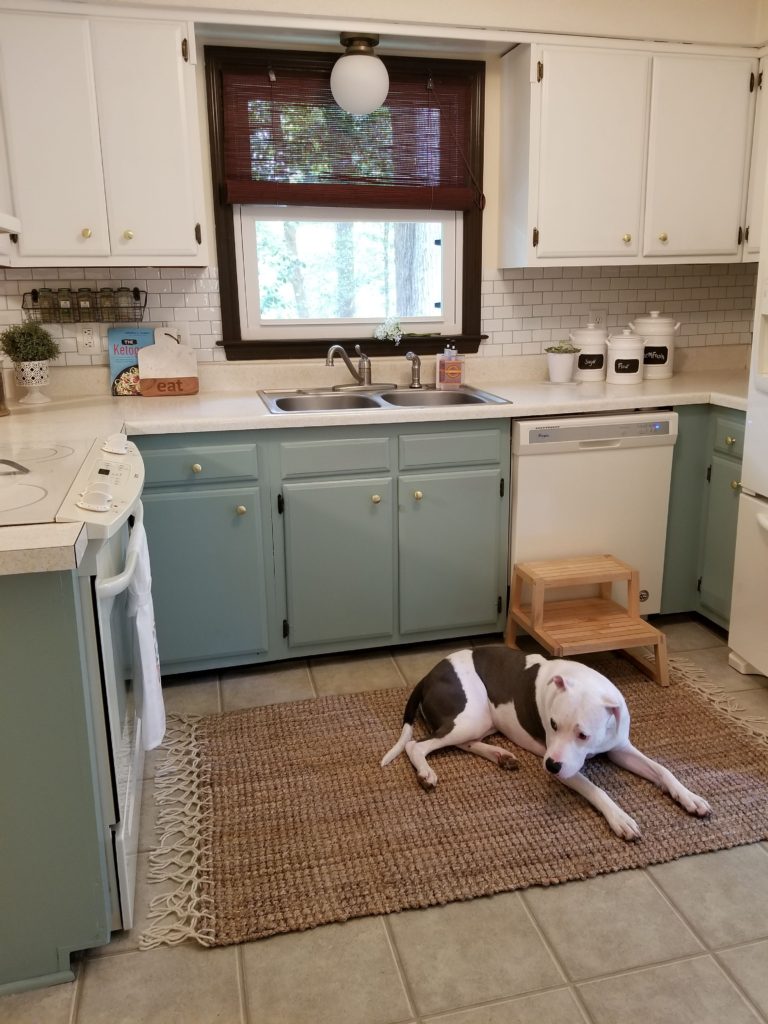
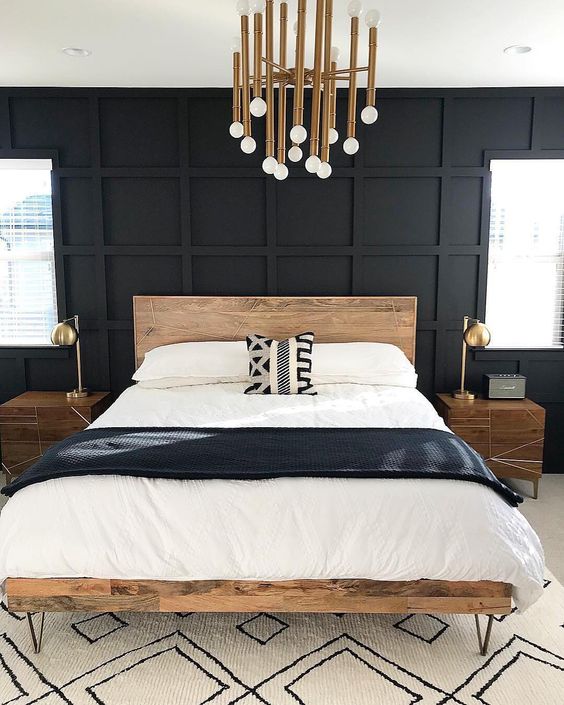
home | DIY

I took my ugly carpeted steps and turned them into smooth wood steps with a sisal runner of my dreams
I can't believe it's been two years since we've moved into our Raleigh home! On one hand, two years seems
*this post is not sponsored in any capacity. I just wanted to provide my truthful review* Let me start by
Full Disclosure: I am weary to ever write about finding your style, style quizzes, or giving advice on home design
The big boom that launched my blog was my $397 kitchen makeover! If you haven't read it - you can
You guys know by now...I love a dark, moody room! Though I flow between loving light and bright spaces and
The other day I was thinking about blog topics and all the things I want to write about. I have
There is nothing more satisfying than flexing those creative muscles - and really stretching your dollar. When I started with
I know you all have been waiting for this, and I'm so excited to finally say the living room is
When you think of a Shiplap, Sharpie is probably not the first thing to come to mind! However, this faux

DIY Stair Runner

staircase makeover

I took my ugly carpeted steps and turned them into smooth wood steps with a sisal runner of my dreams cascading down…and it was a lot of blood, sweat and tears. Quite literally.

If you have carpet and want to rip it up, I say just go for it. The worse that can happen if you have to tack it back down if the floor sucks underneath. Luckily when I started pulling the carpet off my steps (and it didn’t resist at all. yay old carpet) the treads underneath were a beautiful pine that was in great condition. I guess the layers of thick carpet and padding kept them nice all those 30 years they were covered.

Step one – remove the nastiest of carpet from the steps…

stair runner makeover
this isn’t a screen shot from a horror film..this is move in day at our 1970’s home!

It took me and my fiance about 12 hours total to rip all the carpet off our 13 steps, pull the tack strips up and painstakingly pull out hundreds..possibly thousands of staples. The wood was still in good condition after that, miraculously. Please don’t be fooled thinking that redoing your stairs is a one day project. This took weeks, and we worked really fast!

If you did have a ton of holes from nails and staples, you can use wood puty and sand over it. I am notoriously lazy and like to cut corners with home improvement, so I didn’t do this. I also knew the carpet runner would cover most of it, so why do extra steps?

Sand + Poly

Next up – sanding! I have a small sander from Amazon that works wonders. Don’t ask me what grit sandpaper I used because I don’t know. I used whatever I could find in the shed and it worked! I lightly sanded each step and made sure wherever our feet would hit there would be no chance of a splinter or sharp edge. That step took only about 30 minutes! I cleaned up the steps and got onto sealing them pretty quickly.

I used a polyurethane sealant for the steps. It was not meant for flooring, it was for furniture, but yet again the steps would be covered more than 3/4’s by a durable floor runner, so spending my time coating them with poly would be a waste in my opinion. I applied 3 coats of polyurethane, evenly and thinly, and called it a day!

*I have a 70 lb dog who treats the steps like his own personal playground. The stairs are made of pine which is softwood – so while the poly prevented scratching, it didn’t protect from denting from his nails.*

diy stair makeover
after sanding and before poly!

Staple, tape, repeat. Attaching the stair runner!

I still have PTSD from this part of the project. I cried, I stormed out of the house, and I may have thrown a broom down the steps out of pure frustration. Here is where you can learn from me! Do not use a manual staple gun…your hand will turn black and blue from bruising and it will take you 15 hours to staple through a thick runner. Buy or rent an autmatic pressure staple or nail gun. It will go so fast for you. That is not my experience however…

First, I bought a 22′ runner for my stairs. I can’t actually remember how to got to 22′ being the length I needed, but I believe I just measured the rise and run of the steps and multiplied it by 13 (how many steps I have) and then added 2 feet for good measure. 22′ was also the longest runner I could find – I really didn’t want to deal with any seams.

I purchase this sisal runner from Overstock. It was on sale, and had great reviews. Sisal and Jute are extremely durable (remember my 70 lb dog). Sisal is also neutral, which goes with my new floors and beach house vibe! However, what I didn’t think about what how nonpliable a thick sisal rug is (below I recommend PLIABLE sisal + jute rugs. I want you to learn from my mistakes!) It’s very strong, so bending it over the lip of the stairs was hard and I had to use my handheld steamer every single time. The steamer is really helpful for any rug you chose to put on the steps though, it makes it much easy to work with when it’s a bit more bendy. (I love my Conair one for $20!)

We stapled the rug at the top of the steps and stapled again on the bottom of the rise. I never stapled on the actual tread due to the possibility that the staple could come up eventually and stab my feet. The plus side of a thicker rug – you can’t see the staples. They are completely hidden in the sisal!

I used a very strong carpet tape on the sides and front of the run – it works like liquid adhesive and holds the runner down quite nicely for extra safety. One roll lasted us the whole 13 steps!

This process of steaming, stapling and taping took about 10 hours from start to finish. In the beginning, it was a lot of trial and error and then we got a good flow.

Important Tips:

  • measure 1 time, 2 times, 3 times to make sure the runner is lined up! Make sure it’s centered from the get-go and measure again every step to make sure it’s still in line.
  • “squeegee” all the air out and make sure the runner is taut and tight against the lip and run of the steps. Air pockets can make it unsafe!
  • Do research on using a carpet pad. We opted not to because our rug had a built-in pad and was very thick, but a thin one would be more comfortable on the feet with one underneath.
  • Make sure the rug you put on the steps is durable. I wanted a pretty vintage Turkish rug, but with the high traffic my steps see, a decorative rug would not hold up over time.
  • Use carpet tape! This is a lifesaver! It’s so simple to use, like double-sided tape. It holds the edges down and gives a crisp look.

Shop my favorite natural fiber
stair runners!

jute runners under $100

*this blog post contains affiliate links. They are of products I love and stand behind! I make a very small percentage of money if you buy from my links, which supports the financial upkeep of this blog. Thank you!*

2 Year House Tour

I can’t believe it’s been two years since we’ve moved into our Raleigh home! On one hand, two years seems like forever ago, and on the other hand, it seems like we’ve been here for a week. When we bought this house, it was as if the house has been wrapped in plastic and was a blast from the past from 1970 [the year it was built]. The wood paneling was freshly polished, the wood trim newly stained, and of course the speckled gold countertops untouched. Because the house was in such good condition (as dated as it was) it was misleading and led me to believe I could cosmetically flip the home in no time! Boy was I WRONG.

If you’ve followed along for any amount of time on my Instagram, you’ll know the trials and tribulations we’ve gone through with the house. The never-ending painting of brown trim, uneven walls, and floors throwing everything off..and oddly placed windows (like the window sandwiched between two walls?) Nevertheless, every month the house is getting to a more acceptable state. It’s a house I’m proud to call home, and the progress we’ve made for money spent makes me feel extra proud.

House Tour Break Down

I’ve written a post on almost all of the makeovers individually, along with the paint colors used in my house..but I’ve never done an evolution post of my home! I’ve redone some of the spaces twice now, and want to show how my style has evolved and my house has progressed. We still have much to do (like replacing all the carpet with gorgeous blonde hardwood floors!) but for now, I want to look back and appreciate how far we’ve come. Let’s dive in, shall we?

Kitchen

This is the first room we tackled! The thrifty $397 makeover launched my blog, and the look has been changed twice already. I may be working on a new look again, but I sure do love this kitchen!

First day we moved in! (April 2018)
The First Rendition of the makeover (June 2018)
November 2019

You can see that a lot was changed in the kitchen over the last two years! We repainted the cabinets twice, swapped out decor and rugs, and added a rolling island cart. I also removed the doors from the upper cabinets on one side to open it up a bit. There isn’t too much more I want to do investment wise into this kitchen. Truthfully the cabinets are awfully laid out (you can’t even open some of them) and if we were to do more to this kitchen it would be a complete gut job. But that’s not likely to happen because we don’t plan to spend more than another year in this house!

Bathrooms

I started by redoing my bathroom, which is the bathroom technically for the two other bedrooms. Our master bathroom is much tinier, and is my fiance’s bathroom. The key to a happy relationship…separate bathrooms!

move in day! April 2018
bohemian bathroom
First makeover July 2018

The first rendition of the bathroom was moody and bohemian! I painted the wall black, hung shelves, swapped out the lights, mirror and hardware, and added contact paper to the countertops.

January 2020

I decided to go light in the bathroom the 2nd time around! I did a sharpie shiplap wall over the black paint, swapped out the shower curtain for a brighter and colorful one, and painted the vanity sage green. [check out my favorite boho shower curtains here]

Master Bathroom

One of my favorite makeovers in this house was the master bathroom! It was featured in Apartment Therapy and On The Today Show website. That’s because we flipped the bathroom for under $200! [You can see the whole makeover here.]

The master bathroom when we moved in 2018
Master bathroom July 2019

Dining Room

eclectic dining room
Dining Room when we moved in 2018
First makeover September 2018

The first thing we did was paint the dining room and switch out the light fixture. We used furniture we had and I refinished the dining table. Then I found my dream dining set and swapped the dining room around again! Most recently, I painted the walls a light green [Clare Paint Review] and simplified the gallery wall. It’s serene and coastal now!

October 2019
April 2020

Most recently, I repainted the dining room in a dusty olive green. I’m going for a lighter and more beach house feel in my home. The gallery wall got simplified with just two oversized photos on canvas too!

Master Bedroom

Our master bedroom has been laid out in every way you can think of. I’ve played musical rugs in here, swapped art around, you name it. But..it had two main phases I would say. The first was the canopy and super bohemian look. I loved this set up so much! The room is tiny and I have pretty bad allergies..so the netted canopy had to go, but it was beautiful while we had it. Now, the bed sits on the floor, with a backdropped of a satin black wall. It’s minimal + cozy, just how I like my bedroom retreat.

master bedroom before and after
Move in day 2018
boho bedroom with canopy bed
July 2018
January 2020

Guest Bedroom

The guest room started out as a fun experiment! $100 and a can of old paint, plus a gifted wall stencil. It was a room that was so fun to create and turned out absolutely adorable, but in the end, it was very trendy and I grew sick of it quickly. [read about the stenciling here]

January 2019
January 2020

The 2nd rendition of my guest room cost me a grand total of $0. I used items from around my house and the leftover paint from my living room. I wanted to create a more neutral space for guests, and because the guest room was the only super colorful room in my home, so it felt out of place.

Living Room

before – just a catch all during renos!
April 2020

The living room wasn’t used for almost an entire year after moving in! We used our basement as a TV room, while the living room just sat as a catch-all for our items. Truthfully I just didn’t have a vision for it! Once I found a nice layout, it came to life. I did my first sharpie shiplap wall [check out here] and a makeshift built-in for my TV. This space is evolving and will soon be changed to match the lighter aesthetic of the dining room.

Home Office

the only photo we have! Before (this was a desk I built) 2018
April 2020

My home office has been through a few different renditions, mostly just swapping out rugs and the gallery wall. However, the structure and layout have pretty much stayed the same. It’s my favorite room in the house, and the one I probably spend the most time in since I work from home.
[You can find the tutorial for my $80 crate desk here]

Entryway

move in 2018
January 2020

The entryway has come a long way! With brown..everything, the first impression of our home was anything but pleasant. We painted the trim white, doors black and shiplapped the wall. The wood feature also allows for practical hanging space which is much better than the console table. I also used peel and stick tile in front of the door for a pop of pattern!

  • my beautiful rug is from T&F rugs (highly recommend!)

Cost breakdown + what’s next

After being in the house for two years, it feels like lot has change. However, to an outside eye, it may seem like very little! When we moved into the house, we had a bedroom set, a sofa and a kitchen table. Everything else we had to buy! We’ve made many changes in the house that aren’t pictured, like painting all the trim and doors in the house, changing out all the light fixtures, and redoing the steps (in progress!).

I spent some time calculating roughly how much we’ve spent on the house over the last two years. From paint and supplies to furniture and decor..and every single space was furnished + made-over for under $3,000. Yes, you read that right. We furnished our home and flipped every space for under $3,000 over two years. I am incredibly proud of that! This has allowed us to save up for things that we want to outsource for..like new floors.

Our home was built in the 70’s..so things were already strange. The bedrooms all have beautiful oak wood floors, and the rest of the house minus the kitchen and bathrooms have a muddy brown carpet. We’ve suffered through two years of this awful carpet and finally this summer we will be replacing it with luxury vinyl plank. It will make a huge difference in the appearance of the home and will only enhance the work we’ve already done! Of course we are no where near done. I already have plans for a new living room set up..and of dream kitchen. We are very aware that we don’t want to stay here forever, maybe another year, two tops, but while it’s home, we want it to feel the very best it can.

I hope you enjoyed my home tour! If you want more looks into my house, follow me over on Instagram @myeclecticgrace and on Pinterest.

A list of the paint colors used in my house can be seen here

I ordered from an online paint company and this is how it went.

*this post is not sponsored in any capacity. I just wanted to provide my truthful review*

Let me start by saying, like most Americans, lock-down had(s) me going stir crazy. I’ve never spent so much time looking at the interior walls of my home..which got me to thinking that this is an excellent time to paint my walls. The only problem is, I can’t just go grab paint at the hardware store right now. That’s when I turned to my trusted friend, Instagram!

I posed my issue of wanting to repaint some rooms in my house, but not being able to get back. Well ask and you shall receive! Over 20 of my followers recommended Clare paints. Being a designer and home decor blogger I was shocked and slightly embarrassed that I didn’t know about Clare or that you could order paint online. I mean it’s 2020 but I just didn’t think that was a possibility!

First things first, I perused their website. Automatically I was entrigued and pleased because I saw this. (screen shots directly from their website!)

Finally! Paint I can feel good about using and that my fiance won’t complain about smelling up the house for days. I ordered a few swatched from the website and for less than $8 I had a few very large peel and stick “swatches” with paint colors I was interested in in my home! I left them up on the walls for about 10 days before I decided which color to go with!

I ordered the paint, and though it was more than I wanted to spend on paint, it was worth it. I have bought my fair share of cheap paint in the past, and let me tell you, when you’re spreading water thin paint for the 5th layer on the same wall, you will curse and wish you would’ve just bought the quality paint to begin with! Within 4 days I had a beautifully packaged gallon of “Dirty Martini” interior paint and new roller covers to start my dining room makeover.

The paint went on like BUTTER. I’m telling you I literally squealed out loud because I was so excited about how luxurious this paint felt rolling it on the wall. I painted over very dark green walls (see below) so I was planning on having to do two coats minimum. I could’ve gotten away with one coat of Clare paint, but I decided to do two just for extra saturation.

The dark green color BEFORE painting with Clare paint

The craziest thing is, I painted the dining room one evening after work and we ate dinner in it 20 minutes later. You couldn’t smell a thing. My fiance was blown away! So chemical stench or headache. That is well worth it in my book.

I painted my whole dining room which is about 10×12′ with two coats, and still have 2/3 of my gallon of Clare paint left. That is incredible to me!

Full Disclosure: While painting with the roller cover I bought from Clare, the roller started to shed really bad. It was coming apart and sticking to my wall which was really disappointing. I sent them a picture via Instagram, at 8:30 at night mind you, and they replied within 3 minutes. They apologized and asked for my address, letting me know they were sending me a new replacement for free right away. That makes me so happy and without a doubt, I can give their customer service 5 gold stars.

I was so hesitant to order paint online from Clare, it’s not something I had ever done. But now, I’m hooked! I’m already looking at what my 2nd gallon is going to me for my bedroom because I just can’t believe how amazing this service is.

Want to get $10 off your order of Clare paints? Use my referral link here!

Simple Hack To Find Your Style

Full Disclosure: I am weary to ever write about finding your style, style quizzes, or giving advice on home design styles. I am an interior designer and editorial stylist by day, but I have struggled deeply with how I want my own home to appear. One factor is my budget and the layout of my home, which greatly detracts from the look I really want. If I had unlimited funds, I would have a very light and bohemian beach inspired home.

That is what I discovered when I was deep in thought this past weekend anyhow. I could go on a whole speel about how life is too short to not eat the damn cake, but you get that. I am here to say, if you want to do something in your home, you have a specific style you love, even if it’s opposite of everything you own…go for it. Let me break it down a bit more.

Deciding Your Style..when you’re totally not sure.

I infamously go between wanting a dark and moody, hygge inspired Scandi-clad space. You feel me? I like the idea of being wrapped in twinkle lights and big chunky knit blankets and dark painted walls..and then the sun comes out and I’m over here pinning beach home pictures. I’ve gone between painting my walls black and then white and then back so many times in my house I think my fiance is going to take my paintbrush privileges away (I kid.)

I was driving him and myself and probably all my Instagram followers crazy. Like yes, my style is eclectic but it’s verging on the edge of just “hmm..that’s interesting” because it’s eclectic trying to be 8 different styles. I fought the urge to have a mostly neutral home because I felt like that was overdone and boring. Then I fought the urge of doing very dark in my house because I thought it would be too depressing.

Then one day I was in my living room picking the space apart about what I loved and what I didn’t love and it hit me!! I took a pile of all the things I loved in my living room and put it on one side of the room and then everything I hated and put it on the other side. I continued to do this through my whole house. It turns out…when I put all the stuff I loved together, it was pretty cohesive. It all made sense..and the things I didn’t like just looked like odd outliers.

boho style board
Items I loved from my bedroom. Muted tones, weathered wood, crisp white linen, and a leather pillow!

Want vs no longer love piles.

In the past I have tried making mood boards with colors and styles of furniture I liked..they were fun but felt hard to actually evoke the same style in my home. By going through my house and selecting actual items I owned and pitting them into my “want” pile, it felt like I already had a place to start.

I also used to feel guilty about changing my style so often, but I decided I was letting trends and everyone else’s voice influence my style when I knew what I instinctually was drawn too.

I also learned another lesson. You can love multiple styles and love the look of things but not want them in your home. This was always hard for me..I tried so hard to capture all the looks I loved, hence the eclecticism. However, I only want to feel one way in my home. RELAXED. I want my home to be so relaxing, cozy and inviting to me, my family and any guests I invite in. When I finally just prioritized how I wanted to feel in my space instead of finding a place for all the looks I loved I instantly became less overwhelmed.

Three items from my living room I am automatically drawn too. Yet again with the natural wood, muted tones, whites, etc.

How can this help you?

If you’re feeling overwhelmed by style or you have a space in your home that just doesn’t feel quite right, just pause for a moment. Leave and re-enter the space, pick out what you’re automatically drawn to. Maybe it’s a feel random items, maybe it’s just one big item. Try to gather 3-6 items into a “style want” pile. (Physically put them all together.)

Then find the items you don’t like in your space and do exactly the same. You may find a similar theme among the wants and the no longer love. If you go through your home and do this, my hunch is that your style will be cohesive throughout and the things you don’t like in one room will be similar to what you don’t like in another.

Things I didn’t like in my bedroom anymore…bulky and dark woods and dark walls!

So as I go forward, it may look like I have some “undoing” to do in my house. However, I look at it as an evolution. I will eventually get to the style that feels like me and fits my goal.

Follow along with me on Instagram to see the
style evolution of my home!

How my $397 kitchen is holding up 18 months later

The big boom that launched my blog was my $397 kitchen makeover! If you haven’t read it – you can see it here. Since completing that makeover, I’ve had so many people inquire about how the products I used are holding up, and how my unsanded painted cabinets are holding up..and I’m going to answer all of that! I will also cover some updates i’ve done since!

Right after the makeover!

My kitchen looked like this (above) after the makeover. I painted my cabinets without sanding (see how here) and added a peel and stick backsplash from Tic Tac Tiles all along the exposed walls.

Peel and Stick Tile Update

It has been 18 months this month since I “installed” the vinyl backsplash and it’s been AMAZING. I would 100% recommend and use it again. Not one corner has started to peel up, it’s not fading or yellowing, and there are not surface issues from me cleaning it. It looks as good as the day I put it up. Over a dozen of my Instagram followers have boughten Tic Tac tiles after seeing mine and have all had positive results. They peel off clean, are super affordable, and come in really chic tile patterns! If you want to reach more about them – I reviewed my subway tile ones here. You can also buy them from Amazon Prime here!

For your own reference – my kitchen gets very humid as I live in North Carolina and I cook a ton. I clean my kitchen a lot, and we use plant-based cleaners so it’s not very harsh, but the tiles still have shown no wear from this. The wall underneath the tiles was painted drywall, but you can stick these over wallpaper, primed wall, smooth wood, vinyl, laminate, and even other backsplashes!

Painted Cabinet Update

As you can see, things have changed! I actually painted OVER my painted cabinets for a second time. Let me get you up to speed here: when we moved in our kitchen cabinets were painted already. Underneath the paint, I’m assuming was some type of veneer wood – the kitchen is original to 1972. I didn’t sand the cabinets, but I primed them with KILZ multipurpose primer which totally sealed the paint on. I then did two coats of latex interior satin paint. Not once did they chip, and I did the whole kitchen in one weekend.

About 10 months later (still no chips or peeling or bubbling) I decided I wanted a more dramatic color. I cleaned the cabinets with light soap and water and painted directly over the old paint. No sanding or priming! It’s been almost a year since I did this and there have been no signs of wear or chipping either. We use our kitchen the most and have a 70lb dog who loves to rub against, throw toys into, and slam his body into the lower cabinets. Needless to say, the paint is pretty darn durable.

A few more updates!

I swapped out my jute rug for a synthetic rug – as the jute was trapping more dirt underneath than I realized. I bought this rug for under $40 for my kitchen and it’s been perfect for the last year!

I also decided to take my cabinet doors off one set of uppers. I wanted to have open floating shelving, but new that tearing down cabinets could open a can of worms, so I settled for some open cabinets instead. I simply just took the cabinets off, filled the drill holes with putty and painted over it. I painted the inside of the cabinet the same color as the outside, but you could always do a fun accent color inside or wallpaper.

I also added an island cart on wheels! I waited for it to go on sale at Walmart and snagged it for $46. I love that it adds storage for cookbooks, extra prep space, and it fits perfectly on the wall opposite the sink. The butcher block counter adds a nice textural touch to the kitchen as well. The one I bought at Walmart has been out of stock for 3 months now (kinda odd, maybe it’s discontinued!) but I found some comparable ones for the same price.

Grade A!

All in all, for under $400, this kitchen has held up really well. I would definitely use the same materials and strategy again in another kitchen and stand behind the thrifty products I used.

If you want more ideas on upgrading a kitchen on a budget (rental kitchens included!) check out this blog post here.

5 dark paint colors to paint your bedroom now

You guys know by now…I love a dark, moody room! Though I flow between loving light and bright spaces and dark moody ones, when cooler weather hits, there is no saving me; I’m a moody gal!

About 3 months ago, I took my canopy down. RIP $18 Amazon canopy [I just wanted something fresh, though I loved this canopy and plan to use it in another space!]. My room felt more open, but it lacked the cozy cave-ness that canopy provided. Oh, you didn’t know I was a bat?

boho bedroom with canopy bed
My room with the canopy! I loved this look.

Something about feeling snuggled into my bed in a dark and texture-rich room makes me soo happy. While I didn’t want to hang more fabric from my ceiling, I knew I needed to cozy-it-up in my master bedroom. So I went to my next best friend, PAINT.

Paint: the cheapest makeover.

Paint can transform a room. My black suede wall in my bedroom grounds the space. It creates a dark backdrop that not only pulls you into the space, but everything instantly pops against it! Even the ugly wooden headboard (yes I LOATHE that rustic headboard) feels rich against the satiny black backdrop. Art looks amazing and expensive too. I don’t know what it is…I love a good dark wall.

Be brave..paint the dang wall!

Okay so maybe you love the idea of painting an accent wall (or the whole room!) dark…but black is just too risky for you. Do not fret. There are SO many beautiful dark wall colors you can do that aren’t as harsh as just throwing black paint up on your wall. I’ve rounded up some of my favorite dark wall colors (black included).

Dark wall colors you
can’t go wrong with!

Benjamin Moore Hale Navy

A classic royal navy blue..I have it in my living room as an accent wall and get so many compliments! Navy is a true classic neutral tone.

Glidden Deep Forest Pine

Green is such a soothing color and pairs so beautifully with neutrals and wood tones

Benjamin Moore Salamander

This is a true deep teal, it’s very similar to my kitchen cabinet color. It’s a rich color that goes with many styles!

Behr Black Suede

Most people shudder at a black bedroom, but it truly creates a cozy and modern feel. Black is classic!

Benjamin Moore
Kendall Charcoal

Charcoal is great for classic and traditional styles. It’s just edgy enough and really pops with pure white accents!

If you want more paint color ideas, I do have my whole house paint color list here!

My favorite boho shower curtains for under $30

The other day I was thinking about blog topics and all the things I want to write about. I have a list of about 30 things, but instead of using one of those I decided I would write about one of the questions I get asked about the most. My SHOWER CURTAIN! Believe it or not, one of my most-liked Instagram pictures (15,000 likes!) is of my bathroom and front and center is my shower curtain. Every time I post a similar picture I got tons of DM’s and comments asking where it’s from. Since I’m not cool enough yet to get the swipe up feature and link it for y’all on the gram, I decided to write about it.

While I’m showing you where exactly the shower curtain is from, I wanted to do a round-up of some of my favorite boho (and look-alike) shower curtains I found.

Switching out your shower curtain is one of the simplest and most cost-effective ways to transform a bathroom!

Anthropologie Agneta Shower Curtain

Sweet back story about this shower curtain (seen below in my bathroom!) I really wanted it – and I talked about how much I loved the Angeta from Anthro, however, my thrifty budget didn’t allow me to spend nearly $90 on a shower curtain. I spend $90 on 2 weeks of groceries, so from my perspective, it was out of reach. A very kind follower and friend of mine told me she had one she no longer used in her home and sent it to me for free. It was one of the kindest things anyone has ever done for me

Many of you wonderful thrifty followers also don’t want to spend $88 on a shower curtain…and guess what? I found a complete look-alike from Amazon for less than $30. I think that is something to celebrate!

A few of my other favorite
shower curtains!

There are plenty of more but I felt these ones were the cutest for the best price. If you ever get bored with your shower curtain and want to switch it out, you can still use the old one. I’ve used mine as throw blanket accents, made outdoor pillows, used them as curtains..the list goes on and on!

15 ways to reuse your shower curtain: courtesy of DIY.com

$200 Industrial Farmhouse Bathroom makeover

thrifty modern farmhouse bathroom makeover

There is nothing more satisfying than flexing those creative muscles – and really stretching your dollar. When I started with this horribly drab and outdated bathroom, there were two things I knew of off the bat:

  1. I didn’t have much money to do this. I needed to refresh this bathroom on a dime!
  2. This bathroom isn’t for me – it’s my fiancé, Brian’s, bathroom, so I wanted to go for a style that was more masculine and streamlined that my typical colorful boho look.

I set a goal for myself; I would refresh this bathroom for under $200. I announced it to Instagram, and like that, I had set a goal that I was being held to! This challenge was exciting and made me think even more creatively and dig deeper into my thrifty resources to transform this bathroom.

Typically, I don’t reveal how much I spend until after I show everyone the space, but I am seriously impressed with how much I stretched my tiny budget and how great the impact is – so I’m going to brag first!

Budget Breakdown:

Please note that I bought things on sale or with coupons so some of the prices shown in the links could fluctuate, but they are the exact same product.

Grand total: $191.50

So now that you know how I broke the budget down, I hope you’re even more impressed with this makeover! It took me a total of a week, mostly just doing a few hours here and there before and after my full time job.

Before: brace your eyeballs.

This 3/4 bathroom is attached to our master bedroom, but only Brian uses it. This is the one space we hadn’t touched since we moved in a year ago. It had no storage, no style…and to say the least it needed some help in every department.

A picture from our home’s listing when we bought it.
bathroom makeover on a budget
Plastic shower curtain from the dollar store, and spice racks as shelves…to top it off we had nice glossy sheen flesh colored paint.
You’re not seeing that wrong…the door, trim and walls were all covered with the same thick layer of semi-gloss paint. The color you ask? I’d call it cat puke.

After: Industrial Farmhouse Bathroom magic!

Black, white and organic elements like plants and wood…makes my heart swoon!

There is something about a simple color palette with pops of texture…it’s so soothing. Brian wanted a masculine bathroom with organic elements like plants and real wood.

The shower rod got a fresh coat of paint..along with the light fixture which took it from 1985 to 2019. The counters got elevated with marble contact paper that added that extra sparkle to this space.
That beautiful wall of subway tile is what makes takes this makeover from “good” to WOW. It was done with a ruler, level and oil sharpie. Yes – it’s just drawn right over the paint. (just like my faux ship lap wall!)
The blank wall next to the shower now has a very personal touch. This map of Charleston not only adds the cool industrial chic vibe, but it’s Brian’s favorite place. Charleston is where we got engaged. Adding personal touches to spaces as small as bathrooms truly goes a long way!

I am beyond happy with how this bathroom turned out! Stretching my shoe string budget never felt so satisfying..and truly goes to show that you don’t need a million bucks to have a beautiful home.

If you enjoyed this thrifty makeover, make sure to check out my other thrifty bathroom, and kitchen makeover! However if you want to keep up to date with all my thrifty tips and home decor secrets – head on over to my Insta and give me a shout!

See my bathroom makeover featured on Apartment Therapy!

Thrifty Living Room Reveal!

I know you all have been waiting for this, and I’m so excited to finally say the living room is LIVABLE. I’d be lying if I said it was done, because truth be told, only 3 of the 4 walls are painted and the TV wall is a sight to be had, but the main living area is complete.

You all know by now, (and i’m comfortable confidently saying) that i’ve mastered thrifty home makeovers. This living room was no exception coming in at just under $130 for a complete update. At the bottom of this post I will do a complete cost breakdown, and keep in mind for 90% of the room i’ve reused items in my home from different spaces or just refreshed what was in here. It just goes to show you don’t need a huge budget to make a huge impact.

Before

My house was a sea of beige and horribly stained woodwork when we moved in a year ago. Repainting all the trim and doors has been a chore to say the least. The living room was one of the last rooms to get a good coat of fresh paint and white trim and it was like breathing a breath of fresh air into the space!

before the makeover
This was after I took the white curtains down and hung up the blinds..but this room was a disheveled MESS.

I’m embarrassed that my living room ever looked like this, especially because this is the first thing you see when you walk through the front door, but this is #reallife. And my real life was (is) super messy and chaotic.

I was on a tight budget and timeline – I didn’t want to sink a lot in and buy any new furniture, and I also am very limited with time in this season of my life. Let me show you what 3 days and $127 did for this space…

After

faux shiplap living room
Now THIS is the first thing you see when you look through the entry way of our home!
shiplap living room
Wilbur would not budge, so here he is in the makeover reveal. Would you really expect anything else??

Don’t let Wilbur distract you from the amazing transformation of this room! Yes – it was simple changes. I didn’t get new flooring (like I want) or a new sofa, but the magic of paint and a sharpie is kinda freaking amazing.

Is that shiplap….???

That is NOT shiplap! It is sharpie. Yepp you read that right, I DIY’d faux shiplap on my living room wall. It cost a total of $28 for the paint and sharpie and took about 3 hours to do total. This post just focuses on the transformation of the living room, but if you want to see how I did the shiplap on my wall, I wrote a tutorial with all you need to know here!

Simple + clean

A lot of my house is bold and not so simple. Like my green dining room and two toned kitchen, but I spend a lot of time in my living room and wanted it to feel serene. I also knew I wanted to do something visually interesting, and after doing a stencil wall in my guest room, I was feeling fairly confident that I could hand sketch some shiplap on my wall.

modern boho living room
Instead of a traditional side table, I moved this console table that used to be my desk to the sofa’s side. It works beautifully as a vignette and side table now!
black and white gallery wall

I had a collection of driftwood that just sat in the corner forever, then I found this rattan basket for $3 at the thrift store, added my driftwood, and there you go – visual interest and height!

Taking the curtains down and adding simple cordless bamboo blinds opened up the space and added the organic element I wanted. You may also notice the hanging light – I didn’t have a table lamp, but I did have a hanging bulb kit from IKEA and an old lamp shade. I simply screwed a hook into the ceiling, nailed the cord neatly to the window trim, and now have a very practical and FREE hanging lamp.

DIY hanging lamp
Want to make your own affordable hanging light? I’ve included sources in the list below.

Cost breakdown:

Paint: Valspar (Benjamin Moore Simple White) $25
Sharpie Oil Pen: $3
Rattan Basket $3
Gallery Wall Frames: $24 (4 total)
8×10 prints: $12
Bamboo Cordless Blinds: $60
Total: $127

Sources:

$12 Hanging Light Kit

Gallery Frame: Mainstays 11×14 Matted to 8×10 Linear Frame, Rustic

Natural Cordless Burnout Bamboo Roman Shades 48″ W x 64″ L

To shop other items in room – click here.

To see more of this space follow me on Instagram! Don’t forget to check out the faux shiplap tutorial as well!

Sharpie Shiplap Wall

sharpie shiplap diy

When you think of a Shiplap, Sharpie is probably not the first thing to come to mind! However, this faux Sharpie Shiplap wall is seriously my new obsession.

Budget options

I wanted to do something visually interesting to my wall, but it had to meet two criteria: be simple and be very inexpensive. This ultimately ruled out a shiplap wall, however my heart was still intent on it, so I started brainstorming.

A follower of mine on Instagram messaged me a few weeks ago asking me if i’ve heard of Sharpie wall designs. Apparently it’s a new thing and stenciling with a permanent marker is in..I was unamused. Until I realized I could do this with shiplap. A quick Pinterest search showed me that other home DIY’er had done this! There were a few tutorials out there, but nothing real simple, so I just winged it. Now I have a SUPER simple tutorial for you!

Instructions for DIY faux Sharpie Shiplap wall:

sharpie shiplap
sharpie wall art

Items needed:
– Oil Pen Black Sharpie in medium tip
– Level
– Straight edge (ruler or yardstick work)
– Tape measure
– Pencil

I started by measuring from the top of the wall down, marking with pencil every 7 inches. I did this every 12″ horizontally across the wall. (however if you have a long level or yard stick you can do every 24″ across)

I then started at the top again and lined up my ruler and level with the measurement marks. I lightly traced a line across the wall. I did this until I had all my pencil lines across the entire wall.

I went back with the Sharpie and ruler and traced over the pencil, line by line. Don’t be afraid to make the lines thick, and go slow and steady. Traditional shiplap gaps are the size of a nickels edge, and if you press on the marker tip slow and even, it ends up being that size!

It’s that simple.

The beauty of this DIY is that if you mess up the Sharpie Shiplap wall, you simple just paint over the blemish and redo it. It cost me a total of $3 (for the Sharpie marker!).

Want to see the whole living room reveal with the Faux Shiplap wall? Check it out here!